
Main bearings installation tips???
Forum rules
4 posts
• Page 1 of 1
Main bearings installation tips???
 by <8035.html?mode=viewprofile&u=474">79cx500 » Tue Jun 23, 2009 3:30 pm
Hello, I have been rebuilding this 79 cx500 for almost a month now. I finall have all the parts and I am putting it back together and was wondering if anybody had any tips for installing the new crank/main bearings. I don't want to damage them since they were hard to find and I didn't know if using heat on the aluminum block would harm it. anybody done these before??
-
<8035.html?mode=viewprofile&u=474">

<8035.html?mode=viewprofile&u=474">79cx500 - Posts: 16
- Joined: Tue May 12, 2009 2:34 am
- Location: Allen Park, MI. United States
Re: Main bearings installation tips???
by
79cx500 wrote:Hello, I have been rebuilding this 79 cx500 for almost a month now. I finall have all the parts and I am putting it back together and was wondering if anybody had any tips for installing the new crank/main bearings. I don't want to damage them since they were hard to find and I didn't know if using heat on the aluminum block would harm it. anybody done these before??
I've rebuilt several engines from the Crank shaft up.Have you had the Crank shaft and pistons/rods you are going to use checked by en engineering company(Rebore specialist can do them as well)?I use one from my local yellow pages.They did me two cranks and 7 con-rods with pistons for £50 GBP.This included machine polishing all bearing faces and checking the service limits.Two rods were no use and one crank was below spec.I gave them my work shop manual for the service limits.
If you are sure the rods and crank are ok then proceed but be warned I ruined an engine build/crank because one of the Rods had been stretched in a partial seizure not visible to the naked eye hence now the engineering check.
Reply and if you are going ahead I will tell you more of my procedures

-

- Site Admin
- Posts: 1140
- Joined: Thu Jul 24, 2008 8:11 pm
- Location: Hull.Yorkshire.UK.2x1980 CX500ZABs:Citroen ZX TD(250,000 miles)
Re: Main bearings installation tips???
by <8035.html?mode=viewprofile&u=474">79cx500 » Wed Jun 24, 2009 5:58 pm
I work in a machine shop and although we are not automotive related I was able to use some of our advanced measuring devices to check all of the tolerances and i feel confident in these parts i am going to use. Can you explain the easiest way to press these new main bearings in so I don't damage anything?? to get the used one's out I had a solid piece of metal round stock machined down to just below the bearing size outer diameter and used it as a punch, worked great but want to make sure they go in properly. Any other pointers would be greately appreciated. I am also nervous about getting the timing set up correctly, any tips??
Thanks for all your help.
-Mike
Thanks for all your help.
-Mike
-
<8035.html?mode=viewprofile&u=474">
<8035.html?mode=viewprofile&u=474">79cx500 - Posts: 16
- Joined: Tue May 12, 2009 2:34 am
- Location: Allen Park, MI. United States
Re: Main bearings installation tips???
by
79cx500 wrote:I work in a machine shop and although we are not automotive related I was able to use some of our advanced measuring devices to check all of the tolerances and i feel confident in these parts i am going to use. Can you explain the easiest way to press these new main bearings in so I don't damage anything?? to get the used one's out I had a solid piece of metal round stock machined down to just below the bearing size outer diameter and used it as a punch, worked great but want to make sure they go in properly. Any other pointers would be greately appreciated. I am also nervous about getting the timing set up correctly, any tips??
Thanks for all your help.
-Mike
Well you have got me there as I thought you were referring to the Big end bearings.I've been lucky that although the basket case engines I've salvaged,rebuilt had been basically trashed all the Main bearings were good so I never had to renew them.
From what I gather form the Haynes Manual there were two sizes of engine block Hole diameters for the block and the End cap and you have to match the new bearings/colours to the letter/s stamped on the End-cap and bottom left corner of the Rear of the block like you do to the Crank and big-end shells.
There is also a downloadable manual here,
http://drop.io/CX500_GL500
Worth having as well.If as you say you are in a machine shop and you have the correct size shells there should be someone who can help but also ,
http://www.honda-cx-gl.com/CX500-Rebuild.pdf
Save as in your Browser to download.
As for the timing it's very easy and almost foolproof and done when fitting the Cam chain.There are marks on the Crank case at the top where the Top driven gear goes that you line up it's two locking nuts(Use thread lock as per manual or they WILL work lose).
And down at the bottom you line the Woodruff key on the end of the Crank with the mark on the left on the Crank case.
This picture shows it dead easy,
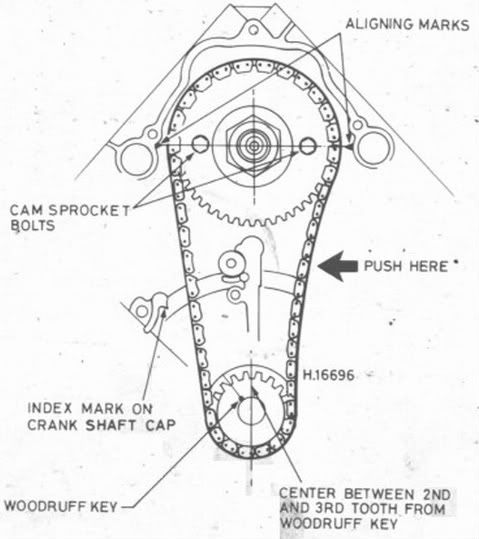
I use a 12" steel ruler to line up the bottom across from the Woodruff key to the mark.This sets the valve timing etc and the ignition timing it taken care of by the Starter Rotor/End cap/Pulsars and Advance and Retard in the rear plate and are for all intents and purposes fixed so they rarely if ever go out-of-timing
It's a great design IMHO.Tips etc.Put some masking tape on the ends of the crank shaft splines before fitting so it cannot damage the new Main bearings when inserting.
Never force the Piston rods down so their Studs can connect with the bearing faces of the crank shaft and damage the crank.
Use Molypaste if possible on the Bearing faces of the shells but the none bearing faces where they fit into the motor should be clean and dry.Double check tangs are correctly located.
Double check correct orientation of the Pistons/rods when fitting(Marked on the top Left/Right and direction arrows.

Double check everything on install.It is possible to fit the small drive gear that goes under the main engine drive shaft upside down.Check manual.Inserted wrongly and after several miles you will end up with a cracked and ruined block.
-
- Site Admin
- Posts: 1140
- Joined: Thu Jul 24, 2008 8:11 pm
- Location: Hull.Yorkshire.UK.2x1980 CX500ZABs:Citroen ZX TD(250,000 miles)
4 posts
• Page 1 of 1
Who is online
Users browsing this forum: No registered users and 0 guests